Experiment 1. ELECTROSTATICS
INTRODUCTION
Most modern applications of electricity involve moving electric charges
or current electricity. Historically, however, the first studies
of electricity involved static charges, or electrostatics. In this
course we follow history, starting with electrostatics, and this experiment
is an exercise in electrostatics.
The simplest way to obtain an electric charge is to take almost any
two materials and rub them together. It is found that one of the materials
becomes negatively charged and the other positively. For example, if you
rub a hard rubber rod with a woolen cloth, the rubber rod acquires a negative
charge and the wool an equal amount of positive charge. (Which charge we
call negative is a matter of convention, but with the agreed convention
it is the rubber that becomes negative.)
We now know that all matter contains positive and negative charges.
The positive charge is deep inside each atom on the atomic nucleus, while
the negative charge is on the electrons that orbit outside the nucleus.
In normal, neutral matter the amounts of positive and negative charge are
equal, and we are unaware of either. Given any two materials, it usually
happens that one has a greater attraction, or affinity, for electrons
than the other; when the two are rubbed together, the material with higher
affinity captures a few electrons from the material with lower affinity.
For example, rubber has higher electron affinity than wool; when they are
rubbed together the rubber captures a few electrons from the wool; the
rubber therefore acquires an excess of electrons and is negatively charged,
while the wool is left with a deficit of electrons and is therefore positively
charged.
 In Part II
of this experiment you will compare the electron affinities of several
materials. The instrument you will use to compare electron affinities is
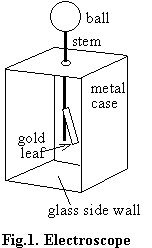
a gold leaf electroscope, as shown in Fig.1. In Part I of this experiment
you will study the electroscope itself. Using a negative rubber rod and
positive wool you will investigate the effect of a charge close to (but
not touching) the ball of the uncharged electroscope. You will then charge
the electroscope negatively by touching its ball with the rubber rod, and
you will charge it positively by the process called charging by induction.
In particular, you will find that once the electroscope is charged with
a known charge (positive or negative), you can use it to identify the sign
of any other charge that is brought close to the ball.
In Part II
of this experiment you will compare the electron affinities of several
materials. The instrument you will use to compare electron affinities is
a gold leaf electroscope, as shown in Fig.1. In Part I of this experiment
you will study the electroscope itself. Using a negative rubber rod and
positive wool you will investigate the effect of a charge close to (but
not touching) the ball of the uncharged electroscope. You will then charge
the electroscope negatively by touching its ball with the rubber rod, and
you will charge it positively by the process called charging by induction.
In particular, you will find that once the electroscope is charged with
a known charge (positive or negative), you can use it to identify the sign
of any other charge that is brought close to the ball.
In Part II you will study six pieces of plastic whose electron affinities
you are to compare. If you rub any two together, then by bringing them
close to the charged electroscope (one at a time) you can find which became
negatively charged and hence which has the higher electron affinity. By
doing this for every pair of materials, you can establish the relative
affinity of all of the materials and list them in order.
NOTES
(1) Please treat the gold leaf electroscope carefully. If a charge is
brought near either side window, it pulls the gold leaf sideways and can
tear it. (This really can happen.) Therefore you should always be
careful that charges approach the ball from above (or from the sides
with the metal casing). Never bring charges anywhere near either window.
(2) It is easy to get terribly confused if you don't make sure that
all materials (including you) are electrically neutral before each stage
of this experiment. To this end you will have a metal plate that is "grounded"
by being connected to the metal conduits that carry the wiring in the laboratory.
To discharge the electroscope all you need to do is touch its ball with
the grounded plate; any charges on the electroscope will immediately drain
away to the ground. To discharge a piece of plastic takes more care because
plastic is an insulator and charges cannot move around on it. Thus all
parts of the plastic must make contact with the grounding plate to guarantee
that all charge on the plastic is drained away. A good way to ensure this
is as follows: Run a paper towel under the tap and then wring it out so
that it is damp but not wet. Now wrap it around the grounding plate. If
you wipe both sides of a plastic sheet (or roll a plastic rod) across the
damp towel, this should discharge the plastic effectively. You can check
that it is neutral by bringing it close to the electroscope.
EQUIPMENT
Gold leaf electroscope
Hard rubber rod
Woolen cloth
Grounding plate
Six plastic samples, as follows:
1. Nylon (yellowish gray rod)
2. Polypropylene (translucent rod)
3. Teflon (white rod)
4. Acrylic resin (clear strip)
5. Polystyrene (gray strip)
6. Polyvinyl chloride (dark gray strip)
PROCEDURE
I. THE ELECTROSCOPE
(1) Make sure there is no charge on the electroscope so that its leaf
hangs straight down as in Fig. 2a. Now rub the rubber rod with the wool
and bring the rod close to (but not touching) the ball of the electroscope,
causing the leaf to rise. It is easy to explain why this happens with a
simple diagram as in Fig. 2b: The negative charges in the rod repel some
negative charges in the electroscope's ball down to the stem and leaf;
since like charges repel, the leaf moves away from the stem until the torque
of gravity balances the torque of the electrostatic repulsion. Take away
the rubber rod, and bring the wool cloth close to (but not touching) the
ball. (Because the charge is spread over the cloth, it is harder to get
the leaf to rise this way.) Record and explain what happens.
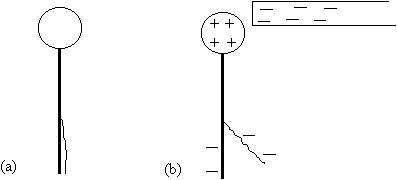
Fig. 2. a) If the electroscope is neutral and no charges are close
by, then the leaf will hang straight down. b) A charged rod close to the
ball causes the leaf to rise.
Question a: Using just a neutral electroscope as you did here,
can you tell the sign of the charge which is close to the ball?
(2) Charge the electroscope negatively by touching the ball with the
negatively charged rod. Find out and explain how you can increase the amount
of charge left on the electroscope. How can you tell that more charge
has been left? Now bring the negative rod close to (but not touching) the
ball, and then do the same with the positive wool. In each case record
and explain clearly (with diagrams like Fig. 2) what happens.
Question b: With the electroscope negatively charged, how can
you tell the sign of a charge which is brought up to the ball?
(3) The electroscope can be charged positively with a negatively charged
rubber rod, by the following procedure: Neutralize the electroscope. Then,
holding the rubber rod in one hand, bring it close to (but not touching)
the ball. Negative charges on the ball/stem/leaf structure will try to
move as far as possible from the rod. Now, keeping the rod in place, touch
the ball with a finger of your other hand. This allows some negative charge
to escape from ball/stem/leaf. Then remove first your finger and
then
the rubber rod.
Question c: Explain clearly with several pictures why this process
of "charging by induction" leaves the electroscope positively charged.
Question d: What happens now when you bring a negative charge
close to the electroscope's ball? Explain. What if you bring up a positive
charge?
II. COMPARISON OF ELECTRON AFFINITIES
You now know how to charge the electroscope negatively or positively,
and how to use it to tell the sign of any charge brought close to it. Charge
your electroscope with negative or positive charge, whichever seems more
convenient. Record which charge you use. Be sure that the leaf is neither
too high nor too low, so that you can see it rise or fall when you bring
up other charges.
Identify your six plastic samples. It is a good idea to label them with
masking tape so that you don't get them confused. You are going to test
each piece against every other piece, making 15 trials in all. (If you
have time you could include the rubber and wool, in which case you will
make 28 trials.) It is most important that you devise a clear, economical,
and unambiguous scheme to record your results.
For each pair of plastics, discharge both pieces and check that they
are neutral. Then rub them together to charge them. (You will need to experiment
a bit to find how to get a good charge. Describe your findings. Is it important
to press hard? To rub for a long time? etc.?) Now use the electroscope
to find out which is negative and which positive. Test both pieces as a
consistency check.
Record your results and draw up a list of the materials in order of
decreasing electron affinity.
Question e: Is your ordering of the materials unambiguous? That
is, if A is higher than B, and B is higher than C, does it follow in every
case that A is higher than C? Can you think of a situation where an ordering
of pairs of things does not have this property of transitivity?
Question f: It is possible to accumulate charge on your hand,
and if the sample you are holding has only a small charge, then you may
get the wrong answer when testing the sample. Devise, test, and describe
a scheme to find out if this is a serious danger. What precautions should
you take in the main experiment?
Prelab questions (to be turned in at the beginning of
the lab period).
-
How many plastic samples are used in this experiment?
-
If a hard rubber rod is rubbed with a woolen cloth, will the woolen clothe
acquire a negative charge or a positive charge?
-
Which has the smaller electron affinity: hard rubber or wool?
-
Describe the procedure used to remove any net charge from a plastic sample,
so that the sample is electrically neutral.
-
There are two ways to charge an electroscope using a negatively charged
rubber rod:
1) touching the rod to the electroscope, or
2) "charging by induction" as described in section(3) on page 1.3.
Explain in words and pictures how these two methods differ. Also, state
clearly what the sign of the resulting charge on the electroscope is in
both cases.
-
Dry lab